NavCal Marine Services LLC 865-765-3407
Using the pcDuino3 in Commercial Applications with Linux and C
by John C. Farmer (c) NavCal Marine Services, LLC, Knoxville, TN, 2015
Chapter 1 - Getting Started
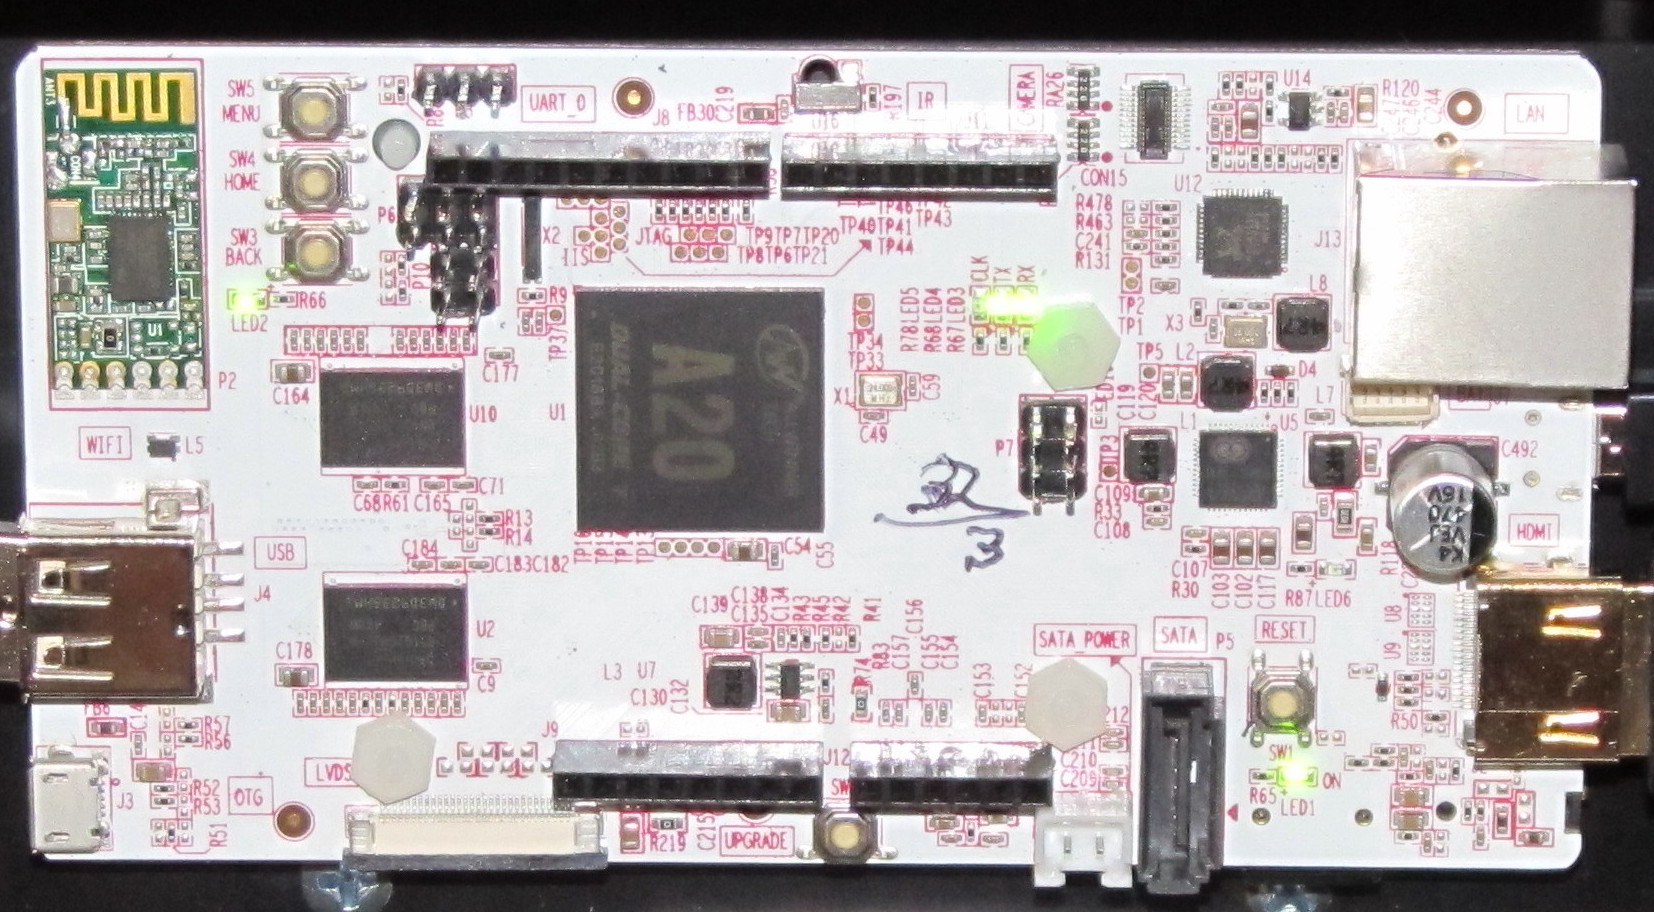
The pcDuino3 by LinkSprite (www.LinkSprite.com) is a very powerful, completely solid state 4.8" x 2.6" computer on a single circuit board (see below). As with most new hardware adequate documentation has not caught up with the hardware and we will attempt to address that here and with our book, now being researched and written. At my former computer consulting company, we always said, "The 'Hard heads' come first, the 'Soft heads' next and the 'Pencil heads' are always struggling to catch up. " This will almost always be the case. The hardware is developed first and then the software need to make it function is added. After all of that is in place someone (not a developer) needs to write the user documentation. Never let the developers write the manual! They know what it will do but many details are too obvious for them to mention for the rest of us.
The pcDuino3 has an AllWinner A20 SoC CPU with 1GHz ARM Cortex A7 Dual Core and uses OpenGL ES2.0, OpenVG 1.1 Mali 400 Dual Core. It has 1GB of DRAM, 4GB of Flash memory and a microSD card (TF) slot for up to 32GB of additional storage. It includes Arduino-Style peripheral headers and HDMI video output with HDCP support. The board has a SATA host socket, IR receiver, Li-Poly battery connector, LVDS LCD interface, MIPI camera interface and a 3.5mm analog audio socket plus I2S stereo digital audio. It includes both a USB host and a USB OTG socket. The board comes with Lubuntu (Linux) 12.04 and Android ICS 4.2 is supported. The board has 0.1" spaced general purpose I/O (GPIO) headers, RJ45 Ethernet connection and on-board Wi-Fi module. It only requires 5V DC at 2 amps. The application program interface (API) accesses the following interfaces: UART, ADC, PWM, GPIO, I2C and SPI (explained below). It can be programed in C or C++ with GNU (www.gnu.org) tool chain (software support), Java with Android SDK (software development kit) or Python.
The board I/O headers are spaced like the popular Arduino Uno and include:
- A Side pins (top to bottom):
- IOREF
- RESET
- 3.3V output
- 5V input power, 2 amps needed
- 2 Grounds
- Vin - not used on this board
- A0 & A1 - 2 volt, 6 bit, 0-63 count (2% resolution) analog input
- A2 & A3 - 3 volt, 12 bit, 0-4095 count (0.02% resolution) analog input
- A4 & A5 are the same as A2 & A3 but we need them as shown below
- A4 - I2C data SDA (see SDA below)
- A5 - I2C clock SCL(see SCL below)
- D Side pins (bottom to top):
- D0 - needed for UART serial data receive
- D1 - needed for UART serial data transmit
- D2 - D9* 3.3 volt, 4 ma max, digital I/O called GPIO
- *D3, 5, 6, and 9 can also be used for pulse width modulation (PWM)
- D10 - D13 same as above but needed as shown below
- D10 Serial Peripheral Interface SS
- D11 Serial Peripheral Interface Input MOSI
- D12 Serial Peripheral Interface Output MISO
- D13 Serial Peripheral Interface Clock
- Ground
- AREF - not used, board uses an internal reference
- SDA - Two wire date transmit and receive
- SCL - Two wire data clock signal
Because some pins serve dual purposes we are left with four pure analog inputs and eight pure digital I/O pins that we can use. This is not a problem as we will use multiplexers to get 16 more analog inputs by sacrificing A2 and A3 (circuit board under development, www.NavCal.com). We will do the same to get 8 more digital inputs by sacrificing D7. We will also need to use D4, D5 and D6 to select the multiplexer inputs.
We will use the Lubuntu (www.lubuntu.net, a version of Linux) since it is a secure operating system and for commercial applications we need that security. Lubuntu uses the "bash" (www.gnu.org/software/bash/manual/bash.html) that is similar to Linux "dash" command line and differences will be explained. Software examples will be in C as it is a powerful, well developed and documented language. C++ and Python software are also available or Java software under the Android operating system could be used. We will not cover Sketch software as it is primarily an introductory software training tool and is covered elsewhere.
To get started you can connect a 5 volt DC, 2 amp well regulated cell phone charger (not plugged in yet) to the micro USB connector under the board between the RJ45 Ethernet and HDMI connectors. Connect a small TV set with an HDMI input to the HDMI connector to use as your monitor. Connect a multi-outlet USB extender to the USB connector under the green Wi-Fi card on the board and connect a USB keyboard and USB mouse to the USB extender. Turn your TV set on and select HDMI "Source". Now plug in the cell phone charter and you should see the Lubuntu (Linux) operating system boot up. At this point you should be able to use the word processor and spreadsheet programs to verify that your system is operating. Be sure to click the icon in the lower right and log out and "Quit" before unplugging the cell phone charger (power supply).